CartFlows Store Checkout: How to Enable Global Checkout

Introduction
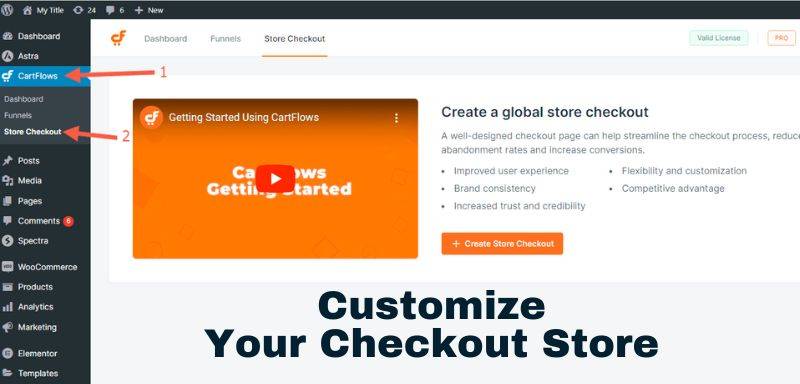
In the latest update of CartFlows (version 1.10.0), a new feature called Store Checkout has been introduced to simplify the management of the global checkout. The concept of Global Checkout has been deprecated and replaced by Store Checkout. This new feature allows users to enable a custom checkout page for their online store, providing a seamless and optimized checkout experience for customers.
Changes in the Store Checkout Feature
With the introduction of the Store Checkout feature, there are a few changes that have been made to the previous Global Checkout functionality. These changes include:
1. Enable/Disable Store Checkout
One of the main changes is the ability to enable or disable the Store Checkout feature. This gives users more control over whether they want to use the custom checkout page or revert back to WooCommerce's default checkout page. By enabling the Store Checkout, users can redirect their customers to the CartFlows Checkout page, providing a more streamlined and branded checkout experience.
2. Inability to Prioritize/Move Checkout Step
In the previous version of CartFlows, users had the ability to prioritize or move the checkout step within the flow. However, with the introduction of the Store Checkout feature, this functionality has been removed. The checkout step is now fixed and cannot be moved or prioritized within the flow. This change ensures that the checkout process remains consistent and optimized for all users.
3. Removal of Product Tab from Store Checkout Page Settings
Another change in the Store Checkout feature is the removal of the Product tab from the Store Checkout page settings. In the previous version, users had the option to customize the product display on the checkout page. However, with the new update, this functionality has been removed. Users can still customize the checkout page design, but the product display settings have been simplified.
Related Topic: Fluent Forms Conversational Form: How to Create an Interactive Form
Enabling Store Checkout
To enable the Store Checkout feature, there are a few different methods you can use. Let's explore each method in detail:
1. During CartFlows Onboarding Process
During the onboarding process of CartFlows, you will be prompted to set up the Store Checkout feature. You can choose to enable or disable the Store Checkout at this stage. If you choose to enable it, CartFlows will automatically redirect your customers to the CartFlows Checkout page instead of WooCommerce's default checkout page.
2. Importing a Ready-Made Template
If you have already completed the onboarding process or want to make changes to your existing Store Checkout settings, you can do so by accessing the CartFlows settings menu. Under the Store Checkout tab, you will find the option to import a ready-made template. CartFlows provides a variety of pre-designed templates that you can choose from. Simply select the template that best suits your needs and import it into your Store Checkout settings.
3. Creating Your Own Template
If you prefer to have more control over the design and layout of your Store Checkout page, you can create your own template. CartFlows provides a drag-and-drop builder that allows you to customize every aspect of your checkout page. You can add elements, rearrange sections, and customize the colors and fonts to match your brand. Once you have created your template, you can enable it as your Store Checkout page.
Customizing and Adding Steps to Store Checkout Flow
Once you have enabled the Store Checkout feature and set up your template, you can further customize your checkout flow by adding additional steps. CartFlows allows you to import upsell and downsell steps to your Store Checkout flow. These steps can be used to offer additional products or services to your customers during the checkout process, increasing your average order value.
Related Topic: Connect Divi with Fluent Forms: A Step-by-Step Guide
1. Customizing the Imported Template
If you have imported a ready-made template or created your own template, you can customize it to match your brand and preferences. The drag-and-drop builder provided by CartFlows makes it easy to make changes to your template. You can modify the layout, add or remove elements, and customize the colors and fonts. This customization ensures that your Store Checkout page reflects your brand identity and provides a consistent user experience.
2. Adding Upsell and Downsell Steps
To maximize your sales potential, you can add upsell and downsell steps to your Store Checkout flow. Upsell steps allow you to offer a higher-priced product or an upgraded version of the product your customer is purchasing. Downsell steps, on the other hand, offer a lower-priced alternative or a complementary product. By strategically placing these steps in your checkout flow, you can increase your revenue and provide additional value to your customers.
Replacing WooCommerce's Checkout Page
One of the key benefits of the Store Checkout feature is the ability to replace WooCommerce's default checkout page with CartFlows' custom checkout page. This means that when customers click on the checkout button, they will be redirected to the CartFlows Checkout page instead of WooCommerce's default page. However, the default checkout URL will remain the same, ensuring a seamless transition for your customers.
Deleting Store Checkout Flow
If you no longer wish to use the Store Checkout feature or want to make changes to your checkout flow, you have the option to delete the Store Checkout flow. There are two methods to delete the Store Checkout flow:
1. Deleting the Entire Store Checkout Flow
To delete the entire Store Checkout flow, you can access the Flow Status setting in the CartFlows settings menu. From there, you can select the Delete option, which will remove the Store Checkout flow from your website. This will revert your checkout process back to WooCommerce's default checkout page.
Related Topic: FlexClip Tutorial: How to Create a Tutorial Video Using FlexClip
2. Changing the Design of Checkout Page
If you want to make changes to the design of your checkout page without deleting the entire Store Checkout flow, you can do so by importing a new template in the checkout step's settings. This will replace the existing template with the new one, allowing you to update the design of your checkout page while keeping the Store Checkout functionality intact.
In conclusion, the Store Checkout feature in CartFlows provides users with a simplified and optimized checkout experience for their online stores. By enabling the Store Checkout, users can redirect their customers to a custom checkout page, improving the overall user experience and increasing conversions. With the ability to customize the checkout flow and add upsell and downsell steps, users can further enhance their sales potential. Whether you choose to import a ready-made template or create your own, CartFlows offers a user-friendly interface that allows for easy customization.
If you want to discover other articles similar to CartFlows Store Checkout: How to Enable Global Checkout, you can visit the Tutorials and guides category.

Related Posts: