FlexClip Tutorial: How to Create a Tutorial Video Using FlexClip

-
Step-by-Step Guide
- 1. Open FlexClip
- 2. Choose a Template or Start from Scratch
- 3. Add Media Files
- 4. Record Voice or Screen/Webcam
- 5. Add Scenes and Edit on the Timeline
- 6. Edit Video Scenes on the Canvas
- 7. Apply Filters to Enhance Videos
- 8. Adjust Video Settings with the "Adjust" Feature
- 9. Control Video Speed
- 10. Edit Image Scenes
- 11. Use "Picture in Picture" Feature
- 12. Add Text to Your Video
- 13. Apply Text Styles
- 14. Add Animation to Text
- 15. Add Transition Effects
- 16. Highlight Your Video with Elements
- 17. Use Masks and Frames
- 18. Add GIF Stickers
- 19. Apply Effects
- 20. Add Audio to Your Video
- 21. Utilize AI Tools
- 22. Add Watermark or Branding
- 23. Export Your Video
Step-by-Step Guide
1. Open FlexClip
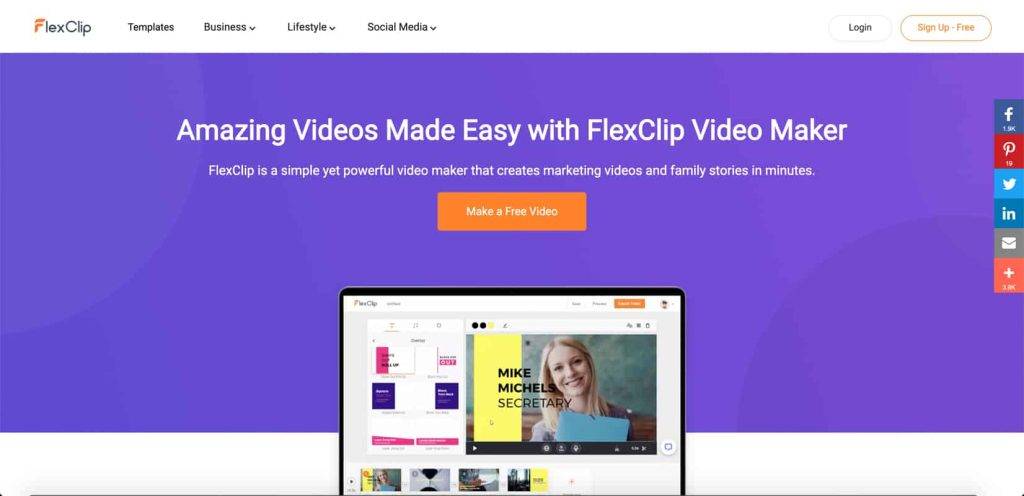
To start creating your tutorial video, open FlexClip in your browser by visiting the website https://www.flexclip.com. This online video editing tool allows you to easily create professional-looking videos without any prior editing experience.
2. Choose a Template or Start from Scratch
On the front page of FlexClip, you have the option to choose a template or start from scratch. If you're looking for inspiration or want to save time, you can select a template from the available options. FlexClip offers a wide range of templates for various purposes, including tutorial videos.
If you prefer to start from scratch, you can click on the "Create by Templates" button to access the editing page.
3. Add Media Files
Once you're on the editing page, you can start adding media files to your project. FlexClip allows you to upload your own files from your computer, phone, or cloud storage services like Google Drive, Google Photos, One Drive, and Dropbox. You can also choose from a collection of stock videos and images provided by FlexClip.
To add media files, click on the "Media" option in the sidebar. From there, you can upload your files or browse through the stock library to find the perfect visuals for your tutorial video.
4. Record Voice or Screen/Webcam
If you need to record your voice or screen/webcam for your tutorial video, FlexClip has got you covered. You can find the recording tools in the drop-down list of the "Record" option in the sidebar.
To record your voice, simply select the "Record Voiceover" option and follow the on-screen instructions. FlexClip will guide you through the process of recording your voice and adding it to your video.
If you need to record your screen or webcam, choose the "Record Screen/Webcam" option. FlexClip provides a user-friendly interface that allows you to easily capture your screen or webcam footage. You can then add the recorded footage to your tutorial video.
5. Add Scenes and Edit on the Timeline
A tutorial video is typically made up of multiple scenes that demonstrate different steps or concepts. In FlexClip, you can add scenes to your video and edit them on the timeline.
To add a new scene, click on the [+] icon on the timeline. This will create a blank scene that you can customize with your media files, text, and other elements.
On the timeline, you can also find various editing options such as split, trim, duplicate, and delete. These tools allow you to fine-tune your video and make precise edits.
If you need more advanced editing capabilities, you can click on the timeline button to open a detailed timeline mode. This mode provides a more comprehensive view of your video's timeline and allows you to edit multiple layers simultaneously.
6. Edit Video Scenes on the Canvas
Once you've added scenes to your video, you can edit them in detail on the canvas. The canvas is where you can see a preview of your video and make adjustments to individual scenes.
The toolbar on the canvas contains various editing features such as duration, zoom, volume, filter, adjust, rotate, flip, speed, and delete. These tools allow you to customize the appearance and behavior of your video scenes.
For example, you can adjust the duration of a scene to control how long it appears in the final video. You can also apply filters to enhance the visual quality of your scenes, adjust the volume to ensure the audio is clear, and rotate or flip the scenes if needed.
7. Apply Filters to Enhance Videos
If your original video footage needs some enhancement, FlexClip provides a range of filters that you can apply to your scenes. Filters can help improve the overall look and feel of your tutorial video.
To apply a filter, click on the "Filter" option in the toolbar on the canvas. This will open a menu with a variety of filter options to choose from. Simply select the filter that best suits your video and adjust the effect value to your liking.
Experiment with different filters to find the one that enhances your video and aligns with the style and tone you want to convey in your tutorial.
8. Adjust Video Settings with the "Adjust" Feature
In addition to filters, FlexClip also provides an "Adjust" feature that allows you to fine-tune the settings of your video scenes. This feature is particularly useful if your original footage has any lighting or color issues.
To access the "Adjust" feature, click on the "Adjust" option in the toolbar on the canvas. This will open a menu where you can customize various settings such as brightness, contrast, saturation, and hue.
By adjusting these settings, you can improve the overall visual quality of your scenes and ensure that your tutorial video looks professional and polished.
9. Control Video Speed
FlexClip gives you the ability to control the speed of your video scenes. This can be useful if you want to emphasize certain steps or concepts in your tutorial.
To adjust the speed of a scene, click on the "Speed" option in the toolbar on the canvas. You can choose between normal speed (ranging from 0.2x to 8x) and curve speed (ranging from 0.1x to 8x).
Related Topic: Miro board: How to create your first board easily
Experiment with different speeds to find the one that best suits your tutorial video. Slowing down or speeding up certain scenes can help viewers better understand the content and follow along with the instructions.
10. Edit Image Scenes
If your tutorial video includes image scenes, FlexClip provides a range of editing tools specifically designed for images. These tools allow you to customize the appearance and behavior of your image scenes.
On the canvas, click on an image scene to access the editing options. You can adjust the duration of the scene, zoom in or out, apply filters, adjust settings, rotate or flip the image, add inside motion, remove the background, and delete the scene if needed.
These editing tools give you the flexibility to create visually engaging image scenes that complement the rest of your tutorial video.
11. Use "Picture in Picture" Feature
The "Picture in Picture" feature in FlexClip allows you to add multiple layers to a scene and play them simultaneously. This can be useful if you want to show a close-up of a specific area while still displaying the main content of your tutorial video.
To use the "Picture in Picture" feature, click on the "Picture in Picture" option in the toolbar on the canvas. This will open a menu where you can add image or video layers to your scene.
Once you've added the layers, you can customize them by cropping, changing opacity, adding animation or inside motion, replacing, and more. This feature gives you the flexibility to create dynamic and engaging tutorial videos.
12. Add Text to Your Video
To provide instructions or explanations in your tutorial video, you can add text using FlexClip's text feature. This feature allows you to add text overlays to your scenes and customize their appearance.
To add text, click on the "Text" option in the sidebar. FlexClip provides a collection of pre-built text samples that you can choose from. Alternatively, you can type your own text and customize its size, font, color, animation, and style.
If you have a premium account, you can also upload your own fonts to further personalize your text overlays.
13. Apply Text Styles
FlexClip offers various text styles that you can apply to your text overlays. These styles can help make your text more visually appealing and engaging.
To apply a text style, click on the "Style" button in the text editing menu. This will open a menu with different style options to choose from. You can adjust the color and other values using the slider to customize the style to your liking.
Experiment with different text styles to find the one that best suits the tone and style of your tutorial video.
14. Add Animation to Text
To make your text overlays more dynamic, you can add animation effects to them. FlexClip provides a range of animation options that you can apply to your text.
To add animation to your text, click on the "Animation" button in the text editing menu. This will open a menu with different animation options to choose from. Select a suitable animation and preview its effect on your text.
Adding animation to your text can help draw attention to important points or make your tutorial video more engaging and visually interesting.
15. Add Transition Effects
To make your tutorial video flow smoothly from one scene to another, you can add transition effects between scenes. Transition effects create a seamless transition between scenes and make your video more visually appealing.
To add a transition effect, click on the "Transition" button in the toolbar on the canvas. This will open a menu with a variety of transition effects to choose from. Simply select the effect that best suits your video and customize the duration, direction, and color if applicable.
Using transition effects can help create a professional and polished look for your tutorial video.
16. Highlight Your Video with Elements
To highlight specific elements or draw attention to certain parts of your tutorial video, you can use elements like arrows, bubbles, shapes, emojis, and more. FlexClip provides a collection of elements that you can easily add to your scenes.
To add elements, click on the "Elements" tab in the sidebar. From there, you can search for the design you need and apply suitable motions to make the elements come alive.
Using elements can help make your tutorial video more visually engaging and guide viewers through the content more effectively.
17. Use Masks and Frames
If you want to add a creative touch to your tutorial video, you can use masks and frames. Masks and frames allow you to add unique shapes and borders to your scenes, giving them a distinctive look.
Related Topic: Miro business canvas lean: What is Lean Canvas & Usage
To use masks and frames, click on the "Mask & Frame" option in the sidebar. Choose a shape from the available options and add it to the canvas. Then, drag and drop a picture or video to the mask/frame, and it will take on the same shape.
Experiment with different masks and frames to create visually interesting effects in your tutorial video.
18. Add GIF Stickers
To add some fun and personality to your tutorial video, you can include GIF stickers. FlexClip allows you to easily add GIF stickers to your scenes.
To add GIF stickers, click on the "GIPHY Sticker & GIF" option in the sidebar. Enter keywords to search for the GIF you need and select the one you want to use. You can then drag and drop the GIF sticker to the desired position in your scene.
Adding GIF stickers can help make your tutorial video more engaging and entertaining for viewers.
19. Apply Effects
If you want to add some visual effects to your tutorial video, FlexClip provides a range of premade effects that you can apply to your scenes. These effects can help create a specific mood or enhance the overall visual quality of your video.
To apply effects, click on the "Effects" tab in the sidebar. Choose from the available designs in different styles and apply them to your scenes. You can also customize the effect in detail if desired.
Experiment with different effects to find the ones that best suit your tutorial video and enhance its overall impact.
20. Add Audio to Your Video
To create a more immersive experience for viewers, you can add audio to your tutorial video. FlexClip allows you to upload your own music files, search for resources from the audio library, or directly upload audio to the timeline.
To add audio, click on the "Audio" option in the sidebar. From there, you can upload your music files, search for suitable audio from the library, or directly upload audio to the timeline. You can adjust the volume, apply fade-in and fade-out effects, split/trim/duplicate/delete the audio, and link it to scenes for synchronous movement.
Adding audio to your tutorial video can help create a more engaging and immersive experience for viewers.
21. Utilize AI Tools
FlexClip offers several AI tools that can help you create stunning videos with ease. These tools utilize artificial intelligence to automate certain tasks and make the video creation process more efficient.
One of the AI tools available in FlexClip is the "Subtitle" tool. This tool allows you to generate subtitles or captions automatically or manually. You can use this tool to add subtitles to your tutorial video and make it more accessible to a wider audience.
Another AI tool is the "AI Video Generator" tool. This tool allows you to generate videos based on text or URLs. Simply input the text or URL, and FlexClip will automatically generate a video for you.
The "AI Image Generator" tool allows you to create images using texts. You can input the text you want to use, and FlexClip will generate an image with the text overlaid on it.
The "AI Video Script" tool generates a detailed description of your video. This can be useful for SEO purposes or for providing additional information about your tutorial video.
Finally, the "Text to Speech" tool allows you to add voiceover to your video using generated speech. This can be helpful if you don't have access to professional voiceover talent.
22. Add Watermark or Branding
If you want to protect your tutorial video or add branding to it, FlexClip allows you to add a watermark or branding elements. This can help ensure that your video is properly attributed and recognized as your own.
To add a watermark, click on the "Branding" option in the sidebar. You can add text branding by typing your brand name and customizing its appearance. You can also add image branding by uploading a JPG or PNG image and adjusting its position, size, and opacity.
Adding a watermark or branding elements can help establish your identity and protect your tutorial video from unauthorized use.
23. Export Your Video
Once you're satisfied with your tutorial video, it's time to export it. FlexClip allows you to export your video in various formats, including MP4, MOV, and GIF.
To export your video, click on the "Export" button. This will open a menu where you can choose the desired quality for your video. You can also customize the size for GIF exports.
If you have added background music to your video, you can choose to export the music separately as an MP3 file.
Related Topic: Tutor LMS live classes: Host Interactive Lessons Easily
Once you've selected your export settings, click on the "Export Video" button to start the export process. FlexClip will process your video and provide you with a download link once it's ready.
That's it! You've successfully created a tutorial video using FlexClip. With its user-friendly interface and powerful editing features, FlexClip makes it easy for anyone to create professional-looking videos. Whether you're a beginner or an experienced video editor, FlexClip has the tools you need to bring your tutorial ideas to life.
If you want to discover other articles similar to FlexClip Tutorial: How to Create a Tutorial Video Using FlexClip, you can visit the Tutorials and guides category.

Related Posts: