Connect Divi with Fluent Forms: A Step-by-Step Guide

1. Install the Divi Fluent Forms Plugin
To connect Divi with Fluent Forms, you will need to install the Divi Fluent Forms plugin. This plugin allows you to enhance the design of Fluent Forms using the Divi Visual Builder, without the need for manual coding.
1.1. Enhance the design of Fluent Forms
The Divi Fluent Forms plugin provides various styling options that allow you to customize the appearance of your forms. You can easily change the colors, fonts, and layout of your forms to match your website's design.
1.2. No manual coding required
With the Divi Fluent Forms plugin, you don't need to have any coding skills to create beautiful and functional forms. The plugin integrates seamlessly with the Divi Visual Builder, making it easy to design and customize your forms without writing a single line of code.
2. Install and Set Up Fluent Forms
Before you can connect Divi with Fluent Forms, you need to have the Fluent Forms plugin installed on your WordPress website. If you haven't already installed it, follow these steps:
2.1. Install the Fluent Forms plugin
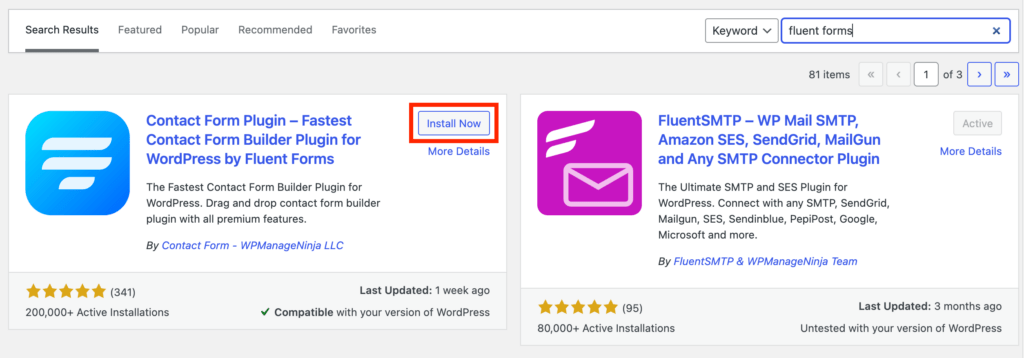
To install the Fluent Forms plugin, go to your WordPress Dashboard and navigate to "Plugins" > "Add New". In the search bar, type "Fluent Forms" and click on the "Install Now" button next to the plugin. Once the installation is complete, click on the "Activate" button to activate the plugin.
2.2. Create a new form
After activating the Fluent Forms plugin, you can create a new form by going to the WordPress Dashboard and clicking on the "Fluent Forms" icon in the left-hand menu. This will take you to the Fluent Forms dashboard, where you can manage all your forms.
Related Topic: FlexClip Tutorial: How to Create a Tutorial Video Using FlexClip
To create a new form, click on the "Add New" button. You will be prompted to choose a form template, import a form, or create a blank form. Select the option that suits your needs and give your form a title.
2.3. Customize the form fields
Once you have created a new form, you can customize the form fields to collect the information you need from your users. Fluent Forms offers a wide range of field types, including text fields, checkboxes, radio buttons, dropdowns, and more.
To add a new field, simply click on the "+" icon next to the form builder. This will open a list of available field types. Select the field type you want to add and configure its settings, such as label, placeholder text, validation rules, and more.
2.4. Save the form
After customizing your form fields, make sure to save your form by clicking on the "Save" button. This will ensure that all your changes are saved and ready to be used.
3. Add Fluent Forms to Divi Page
Now that you have created your form using Fluent Forms, you can add it to your Divi page. Here's how:
3.1. Enable the Divi Builder
To add the Fluent Forms module to your Divi page, you need to enable the Divi Builder. To do this, go to the page where you want to add the form and click on the "Enable Visual Builder" button at the top of the page.
Related Topic: Miro board: How to create your first board easily
3.2. Add a new module
Once the Divi Builder is enabled, you can add a new module to your page. To do this, click on the "+" icon at the bottom of the page. This will open the module library, where you can choose from a wide range of modules to add to your page.
3.3. Search for "Fluent Forms" module
In the module library, search for the "Fluent Forms" module by typing "Fluent Forms" in the search bar. This will filter the modules and show you the available Fluent Forms module.
3.4. Select the Fluent Form
Once you have found the Fluent Forms module, click on it to add it to your page. In the module settings, you will see a dropdown menu where you can select the Fluent Form you created earlier. Choose the form you want to display on your page.
4. Style the Fluent Forms
After adding the Fluent Forms module to your Divi page, you can style it to match your website's design. The Divi Fluent Forms plugin offers various styling options that allow you to customize the appearance of your forms.
4.1. Choose between boxed or underlined form layouts
The Divi Fluent Forms plugin allows you to choose between boxed or underlined form layouts. This gives you the flexibility to create forms that fit seamlessly into your website's design.
4.2. Adjust spacing between fields
In addition to choosing the form layout, you can also adjust the spacing between fields. This allows you to create forms that are visually appealing and easy to navigate for your users.
Related Topic: Miro business canvas lean: What is Lean Canvas & Usage
5. Important Note
It's important to note that the Divi Fluent Forms module is primarily for designing the form within the Divi website. It does not add any extra functionality to the Fluent Forms plugin. The functionality of the form, such as form submissions and email notifications, is handled by the Fluent Forms plugin itself.
By following this step-by-step guide, you can easily connect Divi with Fluent Forms and create beautiful and functional forms for your website. The Divi Fluent Forms plugin makes it easy to enhance the design of your forms using the Divi Visual Builder, without the need for manual coding.
If you want to discover other articles similar to Connect Divi with Fluent Forms: A Step-by-Step Guide, you can visit the Tutorials and guides category.

Related Posts: